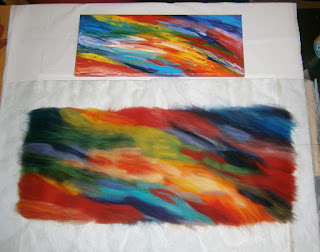
Before I discovered wet felting, I used to do a lot of painting. This is one of my favourite acrylics from 2007:
I decided to try and do a wet felted version of it. I did a couple of layers of Merino tops in a simplified palette of colours, then used some bamboo skewers to split the painting and felt piece into quarters as a guide for adding more detail for the 3rd layer.
I had pretty much all my colours of Merino out for this.
This is the finished layout:
All the wool put away and 'tidy' :)
I took it outside to felt it:
I had an audience:
I put it on the washing line to dry. I usually stand the painting up on its end (right end), and while I was felting, some of the wool must have gotten nudged and I started to neaten it up, but thought it would look quite cool and like it was dripping if I left the wavy edges. They neatened themselves up a bit while I was fulling though, but still looks pretty good.
Finished piece:
Detail:
Tuesday, 16 June 2015
Monday, 8 June 2015
Pencil Roving Mats
I recently got some Pencil Roving when I did a World of Wool order. I liked the look of it, but couldn't decide on which colour, so I decided to get a 500g bag of Pencil Roving waste. I expected more than 4 colours, but it still worked out cheaper. I wanted to see how well it worked layered, so I decided to make a 'woven' mat/coaster type thing. I started off with a 10 x 10 inch template:
Then I cut the pencil roving a bit smaller than the template, 10 strands of each colour:
I laid the strands across the template:
I then held the bottom of the strands down with a ruler and flipped back alternate ones:
I laid the horizontal strands across the columns and then flipped back the other strands:
I used a plastic knife to push the strands in to place.
This is how it looked when it was finished:
I didn't think it looked its best, so I took off a few of the strands at the ends:
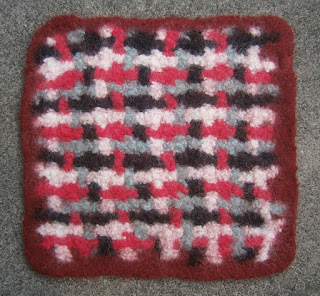
I added a couple of layers of Merino tops, then felted it and fulled it quite firmly. It was about 7.5 x 7.5 inches afterwards:
I also made another mat with pencil roving, I used up some of the spare lengths left over from the other mat, and added rows and columns. This one ended up slightly wider as there wasn't as much roving going across as there was top to bottom:
I thought they turned out really well :)
*** If anyone is interested in the 3 week Wet Felting for Beginners Course, there is just over a week left for registration, the last day is Tuesday 16th June, you can find all the info here: http://feltingandfiberstudio.com/classes/wet-felting-for-beginners/
Subscribe to:
Comments (Atom)


